
Google OAuth
Before using Google services within Internal, you must create a new set of credentials to authenticate against.
Configure consent screen
- Head to the Google OAuth consent screen page.
- Add required information like a product name and support email address.
- Add your domain to the Authorized domains list. (e.g. internal.example.com)
- Click Submit
For more information regarding the Google OAuth consent screen, you can view Google's detailed instructions here.
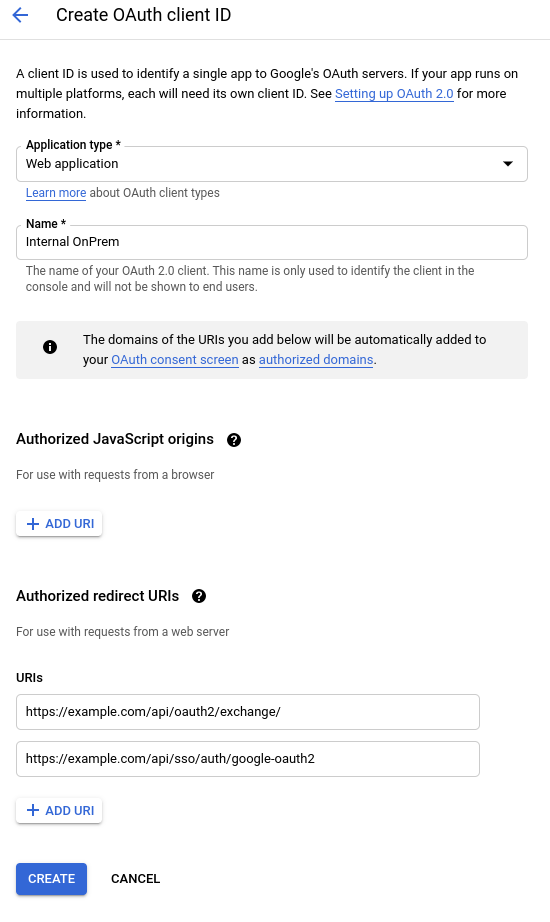
Create authorization credentials
- Head to the Google Credentials page.
- Click Create credentials > OAuth client ID.
- Select the Web application application type.
- Name the OAuth 2.0 client (e.g. Internal OnPrem)
- Add your host to the Authorized JavaScript origins (e.g. https://internal.example.com)
- Add the following Authorized redirect URIs (assuming your host is example.com):
- https://example.com/api/oauth2/exchange/
- https://example.com/api/sso/auth/google-oauth2
Confirm that your settings look similar to below:
If everything looks good, click Create and make a note of your Client ID and ClientSecret. Save these values to your environment file like below.
Enable Google APIs
In order to access Google Sheets as datasources, the Google Sheets and Google Drive APIs must be enabled.
- Visit the Google API Library, select the correct project, and enable the following APIs:
- Google Sheets
- Google Drive
Finishing Up
Now that the credentials have been created and both the Google Sheets and Google Drive APIs have been enabled, re-deploy your Internal image by following the instructions in the OnPrem Deployment guide
Updated about 1 year ago